


RocketSim CLI
Install and use RocketSim's built-in CLI to inspect visible elements, automate interactions, and give agents a fast path into your running Simulator.
RocketSim includes a built-in CLI that lets agents inspect visible UI and interact with the Simulator through the running RocketSim Mac app. The app stays connected to the Simulator, keeps useful state warm, and exposes a compact command line surface for agents and local automation.
For agentic development, we recommend installing both the CLI and RocketSim Agent Skill from RocketSim → Settings → CLI & Agent.
The CLI works with the Simulator UI that is already running. It does not build, install, or launch apps from an Xcode project; use Xcode or your normal build tooling for that step, then let RocketSim inspect and interact with the app on screen.
Installing the CLI
Section titled “Installing the CLI”- Open RocketSim → Settings → CLI & Agent
- In Command Line Tool, click Install Command Line Tool
- Choose the default selected folder if it is on your
PATH, or pick another folder such as/opt/homebrew/binor/usr/local/bin - Confirm the installation
RocketSim creates a rocketsim symlink in that folder. The real executable stays inside RocketSim.app, so App Store updates keep the command up to date automatically.
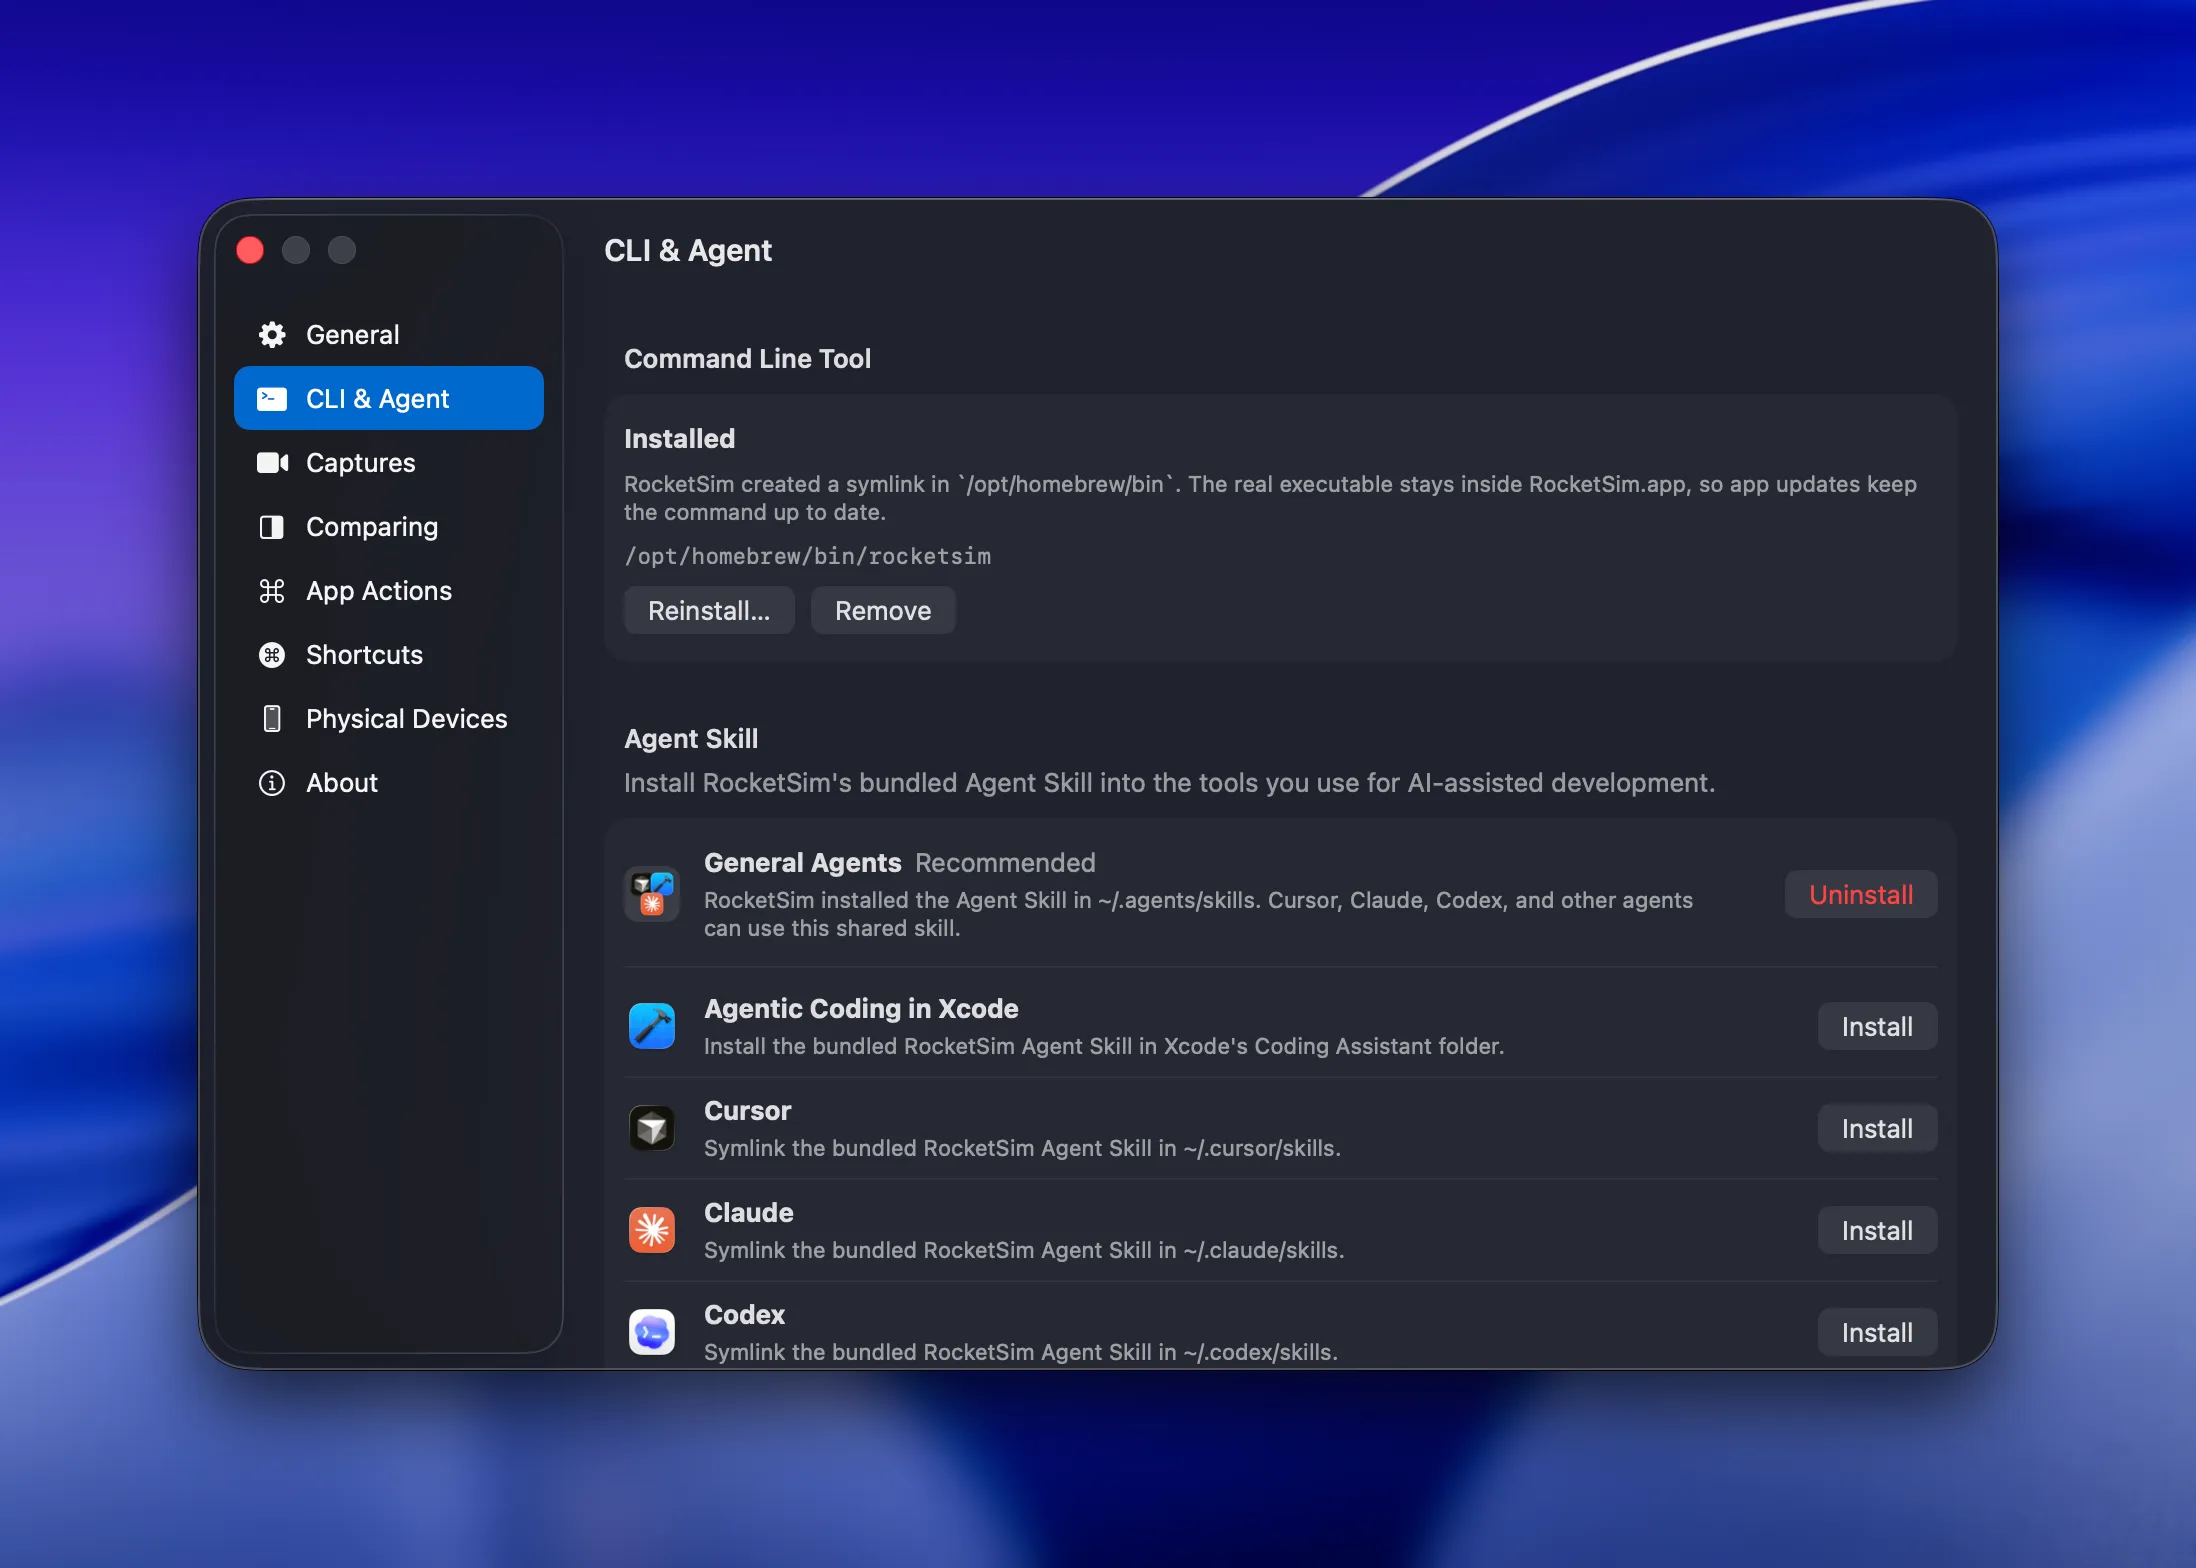
This symlink setup is useful for both agents and CI scripts. Anything that runs rocketsim from PATH uses the same RocketSim version you have installed.
The agent interaction loop
Section titled “The agent interaction loop”The CLI gives agents a compact workflow:
- Ask RocketSim which simulator is currently focused
- Read the visible UI elements
- Decide what to do next
- Tap, swipe, type, or press a hardware button
- Read the updated UI state
- Repeat
That loop is fast because RocketSim is already connected to the Simulator. There is no reconnection overhead between steps, and the running app can cache and optimize work across repeated commands.
RocketSim resolves booted Simulators through the same device service used by the Mac app. Commands therefore work whether the Simulator is shown in Simulator.app, Xcode 27’s Device Hub, or booted headlessly with simctl boot. Without a focused Simulator window, RocketSim automatically targets the only booted Simulator. If several are booted, focus one or pass --udid to choose one.
Why RocketSim is fast for agents
Section titled “Why RocketSim is fast for agents”RocketSim is not just a standalone command that starts from scratch every time. The CLI talks to the running Mac app, which can keep simulator state, reuse context between commands, and optimize repeated screen reads and interactions.
The CLI uses RocketSim’s rs/1 protocol for agent workflows. You do not need to learn the protocol details; it is the compact, agent-optimized layer that lets RocketSim provide reliable screen reads, interaction feedback, and recovery paths while keeping output small.
Compared with other tools for controlling the iOS Simulator, RocketSim used 99% fewer tokens, took up 95% less of your agent’s context (leaving more room for your actual code), and ran 24% faster. Estimated from our July 2026 head-to-head benchmark. Read how we test the CLI and Agent Skill for the scenarios, methodology, and improvement findings.
Key commands
Section titled “Key commands”Doctor
Section titled “Doctor”Checks whether the CLI install, RocketSim app, IPC connection, Simulator state, accessibility permission, and snapshot store are ready for agent workflows.
rocketsim doctorFocused simulator
Section titled “Focused simulator”Returns the currently focused simulator as JSON, including name, runtime, and UDID.
rocketsim simulator focusedBrowser Preview
Section titled “Browser Preview”Starts a live, interactive Simulator preview and prints its local URL:
rocketsim previewPass --port <port> to choose a port or --udid <udid> to target a specific booted Simulator. Add --lan (RocketSim Pro) to open the preview from another Mac on the same network or a Tailscale tailnet; without it, the preview stays on localhost. See Browser Preview for the interactive controls and visual feedback workflow.
Visible elements
Section titled “Visible elements”Returns the accessibility elements currently visible on screen.
rocketsim elements [--udid <udid>] [--agent] [--agent-mode nav|act|debug]The --agent flag is the recommended default for agent workflows. It returns compact rows inside the rs/1 response:
navfocuses on headings, tabs, navigation bars, and top-level controls while omitting plain static text, images, and nested duplicate text compositesactincludes interactive element identifiers, labels, roles, values, and statedebugreturns the full hierarchy when an action fails or an element looks wrong
Elements that expose custom accessibility actions get an extra !actions|id|... row. Every element, including the controls inside a combined row, stays tappable by id.
Both compact modes omit individual software-keyboard keys because keyboard visibility is already reported in the response header. They also omit elements whose frames are fully outside the device canvas. Debug and plain JSON output remain unchanged when you need the complete hierarchy.
RocketSim’s element pipeline is designed for real app navigation. It can include visible controls from top bars, navigation bars, tab bars, and other chrome that agents often need to move through a flow. When web content or other complex views expose limited accessibility data, RocketSim can add recovery hints so the agent knows when to use visual context.
Screen summary and annotated snapshots
Section titled “Screen summary and annotated snapshots”For agents that need a stable view of the current screen, RocketSim provides screen and snapshot commands:
rocketsim screenrocketsim snapshot --agent-mode act > state.pngrocketsim snapshot --label "Photo" --scale 2 --screen latest > photo.pngscreen returns a compact description and screen hash. snapshot writes an annotated PNG whose numbered badges connect visible elements to their identifiers. Filter snapshots by label, type, identifiers, or a crop rectangle when the complete screen would add unnecessary visual context.
The JSON snapshot also includes data.canvasSize ([width, height] in device points), which describes the full screen the elements were laid out in. This is the union of every raw accessibility frame, including the full-screen application root, so it spans the true device bounds rather than just the box around the visible content. Use it to scale element frames onto a rendered screenshot or overlay without re-deriving the device size, which is especially important on scrollable screens where the visible content does not fill the screen.
Use --screen latest for the next action or annotated snapshot. RocketSim resolves it against the current stored screen, which avoids copying hashes between commands while still protecting the interaction from a stale snapshot.
Screenshots
Section titled “Screenshots”When accessibility data is not enough, agents can request a plain PNG screenshot:
rocketsim screenshot > screen.pngThis is useful for visual fallback flows, sparse web content, or debugging what the agent sees. The raw PNG bytes are written to stdout, so redirect them to a file. Target a specific simulator with --udid <udid> instead of the focused one.
Screenshots can also be styled with the same options RocketSim uses for its capturing tools:
rocketsim screenshot \ --bezel simulator \ --background "#0B1221" \ --device-shadow \ --ratio 16:9 > styled.png| Option | Description |
|---|---|
--background <value> | Background color: transparent, a preset color, or #RRGGBB. |
--bezel <style> | Device frame style: none, simulator, device, or device3d (iPhone Duo only). |
--frame-color <value> | Device frame tint as a preset color or #RRGGBB. |
--device-shadow | Render a shadow behind the device frame. |
--ratio <ratio> | Output ratio: auto, 1:1, 5:4, 4:3, 3:2, or 16:9. |
--asc | Optimize output dimensions for App Store Connect. |
--watermark | Render the RocketSim watermark. |
--metadata | Render app metadata when available and supported by the selected ratio. |
--touches | Render captured touches. |
--touch-color <value> | Touch color as a preset color or #RRGGBB. |
--touch-stroke | Render a stroke around touches. |
--orientation <value> | Output orientation: portrait, portraitUpsideDown, landscapeLeft, or landscapeRight. |
To preview the capture in RocketSim’s floating thumbnail instead of writing bytes to stdout, add --show-floating-thumbnail:
rocketsim screenshot --show-floating-thumbnailWhen you capture an iPhone Duo with a styled bezel, RocketSim renders the fold pose for every bezel style. Plain Duo screenshots capture only the display that shows the interface: the outer display while the Duo is closed and the inner display while it is open. See iPhone Duo for the Duo-specific commands.
Video recordings
Section titled “Video recordings”Agents and scripts can record the simulator to an MP4. Recording continues until Ctrl+C, SIGTERM, or an optional duration elapses, at which point RocketSim finalizes the file and writes the bytes to stdout:
rocketsim video record > recording.mp4Press Ctrl+C, send SIGTERM, or pass --duration <seconds> to stop and flush the MP4. Target a specific simulator with --udid <udid> and set the frame rate with --fps <value> (between 1 and 120, default 30):
rocketsim video record --fps 60 --duration 5 --udid <udid> > recording.mp4video record accepts the same styling options as screenshot (see the table above), so you can record framed, touch-annotated, or App Store Connect–optimized clips. As with screenshots, add --show-floating-thumbnail to send the finished recording to RocketSim’s floating thumbnail instead of stdout:
rocketsim video record --bezel device --touches --show-floating-thumbnailTo review or edit the recording right away, add --open-editor. It sends the recording to the floating thumbnail and opens RocketSim’s video editor, so it implies --show-floating-thumbnail:
rocketsim video record --touches --open-editorIf the Simulator is rotated while a recording is running, the rotation is preserved and animated in the exported video.
iPhone Duo
Section titled “iPhone Duo”RocketSim supports the iPhone Duo Simulator from the command line. screenshot and video record render the fold pose for every styled bezel, including the Duo-only --bezel device3d, which uses Apple’s 3D folding model. Passing --bezel device3d for another device returns an error.
Two commands control and inspect the hinge:
rocketsim duo pose closed|book|open [--udid <udid>]rocketsim duo hinge [--udid <udid>]duo posemoves the Simulator hinge to theclosed,book, oropenpose. It does not need Device Hub or the macOS Accessibility permission.duo hingereportshinge_state(closed,openFlat, orpartiallyOpen) andhinge_angle_degrees, where0is closed and180is fully flat.
A typical agent flow poses the Duo, then captures it:
rocketsim duo pose openrocketsim screenshot --bezel device3d > duo-open.pngAccessibility audit
Section titled “Accessibility audit”Audit the visible Simulator screen for accessibility problems, then validate your fixes with the same command:
rocketsim accessibility-audit [--udid <udid>] [--format compact|full] [--no-contrast]The response contains a score from 0 to 100, error and warning counts, and findings grouped by rule with the affected element ids, frames, and a suggested fix. Narrow the run with --rules, --exclude-rules, or --severity error|warning. Pass --screen latest, or an explicit screen hash from rocketsim screen, to guard against auditing a different screen than expected.
Read Accessibility Audit for the rules, the score, and the audit, fix, and validate loop for agents.
Network conditions
Section titled “Network conditions”Agents can test offline and poor-network handling without disconnecting the Mac:
rocketsim network set airplanerocketsim network set 3grocketsim network set 100-loss --bundle-id com.example.approcketsim network statusrocketsim network offNetwork control requires RocketSim Pro and an approved RocketSim Network Extension. Without --bundle-id, RocketSim targets the current Recent Builds. Always turn the condition off after the test.
Network commands are bounded: when the extension is not approved or does not respond within roughly ten seconds, the command fails fast with a network_extension_not_ready error instead of hanging. Its context.reason tells the agent whether to ask you to approve the extension in RocketSim’s Networking window (needs_user_approval) or to simply retry (timed_out).
See Network Speed Control & Simulator Airplane Mode for profiles and setup.
Waiting for UI changes
Section titled “Waiting for UI changes”Agents can wait for screen changes or elements before continuing:
rocketsim wait screen-changedrocketsim wait element --label "Continue"rocketsim wait keyboard --state shownrocketsim wait keyboard --state hidden --timeout 1rocketsim wait time --ms 800This keeps agent flows from racing ahead before the app has finished navigating or rendering. For keyboard waits, shown is an alias for visible; use hidden to wait for dismissal. Prefer observable waits; use the capped wait time --ms <1...10000> fallback only when no screen, element, or keyboard postcondition exists.
When the perception backend itself is failing (rather than the predicate simply staying false), wait reports that backend failure as an execution_failed error instead of a misleading timeout, so agents can run rocketsim doctor and recover instead of retrying a wait that can never succeed.
Interactions
Section titled “Interactions”RocketSim supports the most common agent interactions through rocketsim interact:
rocketsim interact tap --label "Continue"rocketsim interact tap --label "Delete" --index 2 --screen latestrocketsim interact activate --label "Hidden Debug Menu"rocketsim interact tap 210 642rocketsim interact long-press --label "Delete"rocketsim interact long-press --label "Debug" --touches 2 --duration 1rocketsim interact swipe --direction uprocketsim interact swipe --from 200,650 --to 200,150rocketsim interact scroll --label "Results" --direction up --pages 1 --screen latestrocketsim interact focus --label "Email" --screen latestrocketsim interact type "hello@example.com"rocketsim interact button homerocketsim interact biometric matchrocketsim interact biometric nomatchinteract is designed to work with fresh screen state. After dispatching an interaction, RocketSim actively refreshes snapshots during a bounded settlement window before computing the result delta. The returned screen_changed value therefore reflects the post-interaction screen instead of a stale cached snapshot. Large appeared and disappeared detail arrays are capped while appeared_count and disappeared_count retain the complete totals.
Use interact activate for an accessibility element that does not respond to coordinate taps, such as a hidden debug control. It performs an accessibility press on the resolved element instead of sending a HID tap.
Use --touches 2 or --number-of-touches 2 with tap or long-press to automate two-finger gestures.
Use interact biometric match to complete a Face ID request successfully, or nomatch to test the failure path. Biometric commands target the active Simulator and do not take an element selector.
Batched flows
Section titled “Batched flows”When the next steps are already known, combine them in one rocketsim do process. Smart refresh keeps screen state current between interactions while avoiding redundant reads:
rocketsim do \ --refresh-policy smart \ --step "interact tap --label 'Sign In' --screen latest" \ --step "wait element --label Email --timeout 2" \ --step "interact type 'hello@example.com' --label Email --screen latest" \ --step "interact tap --label Submit --screen latest"Prefer a concrete postcondition such as an element appearing or the keyboard hiding. Interaction responses already include a screen delta, so an extra screen-change wait is often unnecessary.
Each step normally starts with interact, wait, elements, or screen. Interaction actions such as tap, swipe, and focus are also accepted directly as shorthand inside a batch.
Why --agent matters
Section titled “Why --agent matters”The --agent flag replaces the full accessibility hierarchy with compact pipe-delimited rows inside the rs/1 response. That means less context per screen read and easier recovery after each interaction.
An act response looks like this:
{ "rs": "1", "ok": true, "data": { "mode": "act", "screen": "a3f291bc", "rows": ["7|button|Continue||enabled", "8|textField|Email||enabled"] }}The identifiers are ephemeral and belong to that screen. Prefer a label selector, use 1-based --index for repeated labels, or use an identifier with --screen latest when duplicate labels make the selector ambiguous. Use debug mode or omit --agent when you need parent relationships, raw frames, scrollable-container metadata, or the complete hierarchy.
This structured output for agents works especially well with the RocketSim Agent Skill, which connects your AI coding tool to the CLI automatically. We highly recommend using the Agent Skill instead of asking an agent to invent CLI calls on its own.
Selector-based interaction
Section titled “Selector-based interaction”When possible, agents should prefer targeting elements by label, type, or value instead of raw coordinates:
rocketsim interact tap --label "Submit" --screen latestrocketsim interact tap --type Button --label "OK" --screen latestrocketsim interact long-press --label "Reorder" --duration 1.5 --screen latestSelector-based taps first try semantic accessibility activation, which is more reliable than a coordinate tap when the visual affordance does not align perfectly with the accessibility frame — think toggles, list rows, and buttons with asymmetric tappable areas. When semantic activation is unavailable, RocketSim falls back to a precise HID tap at the element’s center. Coordinate taps and multi-touch taps always use HID directly. Use interact activate when you explicitly need an accessibility press without any HID fallback, such as for a hidden debug control that ignores coordinate hit-testing.
When a selector matches several elements with the same label, RocketSim automatically chooses the only actionable match if the others are non-actionable containers around it. For genuinely distinct matches, pass 1-based --index <N> in reading order or use an element id.
Coordinates are still available as a fallback when the element is visible on screen but not exposed with a stable label. Raw coordinate and untargeted actions accept the same --screen flag; pass the explicit hash from the snapshot where you chose the coordinate to detect a stale screen before dispatch.
Named swipe directions
Section titled “Named swipe directions”For common gestures, agents can use named directions instead of explicit coordinates:
rocketsim interact swipe --direction uprocketsim interact swipe --direction backrocketsim interact swipe --direction notification-centerrocketsim interact swipe --direction control-centerValid directions: up, down, left, right, back, notification-center, control-center.
Example prompts
Section titled “Example prompts”These prompts work well with the CLI interaction loop:
Use RocketSim to read the visible elements and tap the primary action button
Use RocketSim to swipe through the onboarding carousel and verify each page title
Use RocketSim to type a search query into the search field and select the first result
Use RocketSim to press the home button, then inspect the Simulator after the app is open again
Targeting cloned Simulators
Section titled “Targeting cloned Simulators”Commands that take --udid (such as screen, elements, interact, screenshot, and duo) also find a Simulator that was cloned and booted with xcrun simctl, without opening it in Simulator.app. If RocketSim doesn’t know the UDID as booted yet, it refreshes its device list from CoreSimulator. When a UDID still can’t be found, the simulator_not_found error explains how to check it with xcrun simctl list devices and when to retry.
Requirements
Section titled “Requirements”The CLI works when:
- RocketSim is running
- At least one iOS Simulator is booted
- The command line tool is installed from Settings → CLI & Agent
- The RocketSim Agent Skill has been installed so agents can discover RocketSim automatically
Run rocketsim doctor when the CLI cannot connect, a booted Simulator is not discovered, or accessibility and interactions fail unexpectedly. Routine navigation should start with rocketsim screen or compact elements output instead.
RocketSim refreshes stale Simulator service caches once before failing a command. If the retry is exhausted, the rs/1 response uses simulator_not_booted with context.reason set to simulator_control_lookup_failed. Boot the Simulator, verify its UDID, and retry once. When several Simulators are booted without a focused window, simulator_not_focused tells you to focus one or pass --udid.
On Xcode 27 runtimes, accessibility may be unavailable because of Apple’s remote-automation restrictions. RocketSim returns accessibility_unavailable immediately instead of hanging. In that state, use plain screenshots and coordinate interactions; do not keep retrying accessibility reads, selector interactions, waits, or annotated snapshots for that Simulator.