An accessibility audit on the iOS Simulator checks the screen you are looking at for the problems that are easy to miss: a button without a label, a tap target that is a few points too small, or text that does not have enough contrast. You get a score, a list of findings, and a concrete fix for each one.
RocketSim 16.7 adds exactly that. You can run the audit from the side window, but you can also run it from the rocketsim CLI. That second part matters, because it means your AI agent can audit a screen, fix what it finds, and validate the result without you copying anything around.
Run an accessibility audit in RocketSim
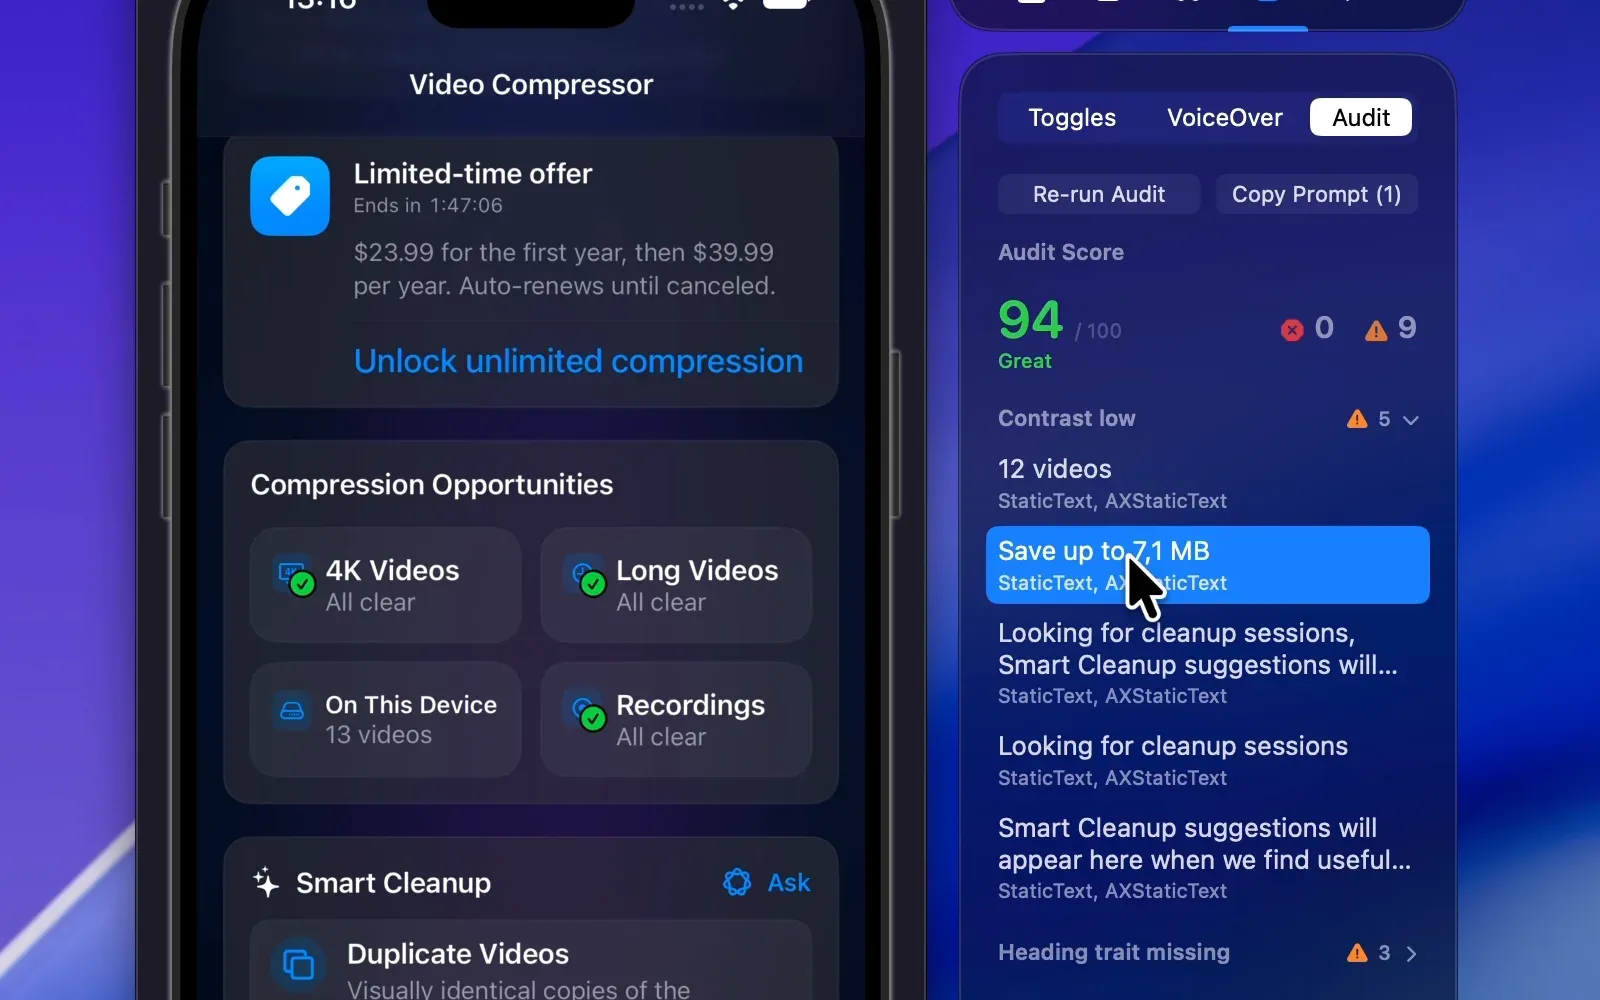
Open the Accessibility window in RocketSim’s side window and select the new Audit tab. Click Run Audit while your app shows the screen you want to check. Here is what that looks like:
Run the audit, select a finding, and RocketSim highlights the affected element on the Simulator.
The audit does not run automatically when you open the tab. I like that, since you decide when the screen is in the state you want to check. After the screen changes, RocketSim marks the result as stale so you know it is time to run it again.
Understand the audit score and findings
The result starts with a score from 0 to 100. A score of 90 or higher is Great, 70 to 89 is Good, and anything below 70 means Needs work. In the video above, the screen scores a 94, with zero errors and nine warnings across 145 audited elements.
Below the score, findings are grouped by rule. The rules that pass get a green checkmark, so you can scan the list quickly. The ones that fail show how many elements are affected. Select a finding and you see three things:
- What is wrong, for example Estimated contrast is 3.85:1; this text should reach 4.5:1
- A suggested fix
- The element and its frame
RocketSim also highlights that element on the Simulator, and the highlight follows the screen when it moves. That makes it much easier to find the culprit than reading a frame like 90,679 102x14.
There are 16 rules in total. A few examples:
missing_labelflags interactive elements without an accessibility label.hit_region_smallflags tap targets below 44×44 points. It becomes an error below 28×28 points.heading_trait_missingflags text that looks like a section title but is not marked as a heading.contrast_lowflags text with low contrast. This is a heuristic, so treat it as a prompt to take a look.
In the video, the heading finding is a good example of what you would otherwise miss. The fix is to add the isHeader trait to the section titles, which VoiceOver users rely on to jump through a screen.
The full list lives in the Accessibility Audit documentation.
What an audit cannot tell you
An audit is a fast first pass, not a replacement for testing with VoiceOver. Some things cannot be detected from a screen alone, like whether an accessibility hint is helpful or whether information is conveyed by color only. RocketSim lists these as not covered, so you know what to check by hand.
For that manual part, the VoiceOver Navigator is a good companion. I wrote about that in How to Test VoiceOver on the Xcode Simulator.
Copy a fix prompt for your AI agent
Findings are only useful when they get fixed. Select the findings you want to tackle and click Copy Prompt. The button shows how many findings are selected, like Copy Prompt (1).
The prompt is written for a coding agent. It tells the agent to keep your layout unchanged, to fix the findings in one batch, and to compare element frames before and after. That last part is important for a rule like hit_region_small. You want to make a button easier to tap without moving everything around it.
Paste the prompt into your agent, let it make the changes, rebuild, and click Re-run Audit. If the score goes up, you are done.
Run the accessibility audit from the CLI
The same audit is available from the command line:
rocketsim accessibility-auditIt audits the visible screen of the focused Simulator and returns the result in RocketSim’s rs/1 protocol. The response includes a summary with the score, the number of errors and warnings, and the findings grouped by rule:
{ "rs": "1", "ok": true, "data": { "screen": "a3f291bc", "summary": { "score": 94, "errors": 0, "warnings": 9, "elements_audited": 145 }, "findings": [ /* grouped by rule, with element ids, frames, and a fix */ ] }}Every finding comes with the element ids, their frames, a message, and a suggested fix. That is everything an agent needs to act on it.
A few flags are worth knowing:
# Only report errorsrocketsim accessibility-audit --severity error
# Skip the heuristic contrast checksrocketsim accessibility-audit --no-contrast
# Run a single rulerocketsim accessibility-audit --rules hit_region_small
# Audit a specific booted Simulatorrocketsim accessibility-audit --udid <udid>
By default, the output is compact and groups repeated findings per rule. Use --format full when you want one finding for every occurrence. You’ll find all options in the RocketSim CLI documentation.
Let your AI agent audit, fix, and validate automatically
This is where it gets interesting. If you installed the RocketSim Agent Skill, your agent knows about rocketsim accessibility-audit and runs it by itself. You do not have to explain the commands. A prompt like this is enough:
Use RocketSim to audit the current screen for accessibility issues, fix the findings without changing the layout, and run the audit again to validate.The agent then works through a loop:
- Audit the screen with
rocketsim accessibility-audit. - Fix the findings in your code, after saving the element frames so it can compare them later.
- Validate by rebuilding, going back to the same screen, and running the audit again.
- Repeat until the findings are gone.
The skill includes a dedicated reference for fixing small tap targets without touching the layout, and the agent compares the frames before and after. Findings it deliberately skips, like a heuristic contrast warning that is fine in your design, can be reported with a short reason.
Since the audit is not tied to the UI, you can use it in any workflow where an agent works on your app. Ask it to audit every screen of a flow, or to check a screen after each change. Combined with the Browser Preview, you can even follow along while it works.
Test more than the audit covers
The audit sits in the same window as the other accessibility tools. The Toggles tab gives you Increase Contrast, Reduce Motion, Dynamic Type, and, new in 16.7, color filters and Liquid Glass options. Run the audit, flip a toggle, and run it again to see whether the result changes. The Accessibility feature page gives an overview of everything that is available.
For a broader view on what Apple expects, the Human Interface Guidelines on accessibility are worth a read.
Conclusion
An accessibility audit on the iOS Simulator turns a checklist you postpone into a ten-second step. Run it from the Audit tab to get a score and highlighted findings, or run rocketsim accessibility-audit and let your agent audit, fix, and validate on its own. The more often you run it, the fewer issues you find late in the process.
If you want to try it on your own app, install RocketSim from the Mac App Store and open the Audit tab in the Accessibility window. Feel free to contact me or tweet me on Twitter if you have feedback on the audit rules or ideas for new ones.
Thanks!