Testing VoiceOver on the Xcode Simulator is one of those tasks every iOS developer agrees is important, and most developers postpone until the last minute. The Xcode Simulator does not ship with a real VoiceOver runtime, so the usual answer is “grab a physical iPhone, enable VoiceOver in Settings, and start swiping.” That works, but it pulls you out of your normal development flow and slows down every small fix.
This article walks through the practical options you have today. You will see what Xcode itself offers, why the physical-device workflow is still painful, and how RocketSim turns VoiceOver testing into a keyboard-driven step you can run inside the Simulator while you develop. The goal is simple: make accessibility checks fast enough that you actually run them.
Why VoiceOver testing belongs in your daily iOS workflow
VoiceOver is the most visible accessibility feature on iOS, and it is the one most likely to break silently when you change a layout. Adding a wrapping VStack or renaming an icon button can flip the reading order in a way you never see visually, but a VoiceOver user will hit immediately. The earlier you catch it, the cheaper it is to fix.
In my experience, the main reason accessibility regressions ship is not a lack of care — it is friction. If verifying a single screen takes ten minutes of device juggling, you will not do it on every pull request. If it takes ten seconds in the Simulator, you will. That is the loop this article tries to give you.
What you can (and cannot) do with VoiceOver in the Xcode Simulator
The honest answer is that the Xcode Simulator does not run real VoiceOver. There is no Settings toggle that turns it on the way you would on an iPhone, and the triple-click side-button shortcut does not exist either. The Simulator is a great development tool, but it is not designed to be a screen reader sandbox.
What you do have is Xcode’s Accessibility Inspector. It can target a running Simulator, list accessibility elements, highlight them on hover, and run audits for missing labels or low contrast. It is genuinely useful for debugging a specific element, but it is not a substitute for stepping through the app the way VoiceOver actually does. You see metadata, not behavior.
That gap — inspecting elements versus moving through them — is exactly the reason most developers fall back to a physical device once they want to verify a full screen or flow.
The physical-device workflow (and why it slows you down)
On a physical iPhone, you enable VoiceOver from Settings → Accessibility → VoiceOver and bind the Accessibility Shortcut to a triple-click of the side button. From there you swipe right and left to move through elements, double-tap to activate, and rotate two fingers to switch rotor categories. It works, and it is the most accurate way to experience your app the way a VoiceOver user would.
The problem is the development loop around it. You build and deploy to the device, switch focus from Xcode to your phone, enable VoiceOver, find the bug, disable VoiceOver so you can use the keyboard again, walk back to Xcode, change one line, and repeat. Every iteration breaks your context.
You will still want to validate critical flows on a real device before shipping. But for the dozens of small fixes you make while building — reordering elements, adding labels, grouping a card, tagging a heading — the device-based loop is too slow to use as your default.
Testing VoiceOver on the Xcode Simulator with RocketSim
RocketSim’s VoiceOver Navigator closes that gap. It runs alongside the Xcode Simulator and shows a numbered overlay on every accessibility element in the exact order VoiceOver would announce them. You see the reading order without listening to the reading order — which is usually what you actually need while you are coding.
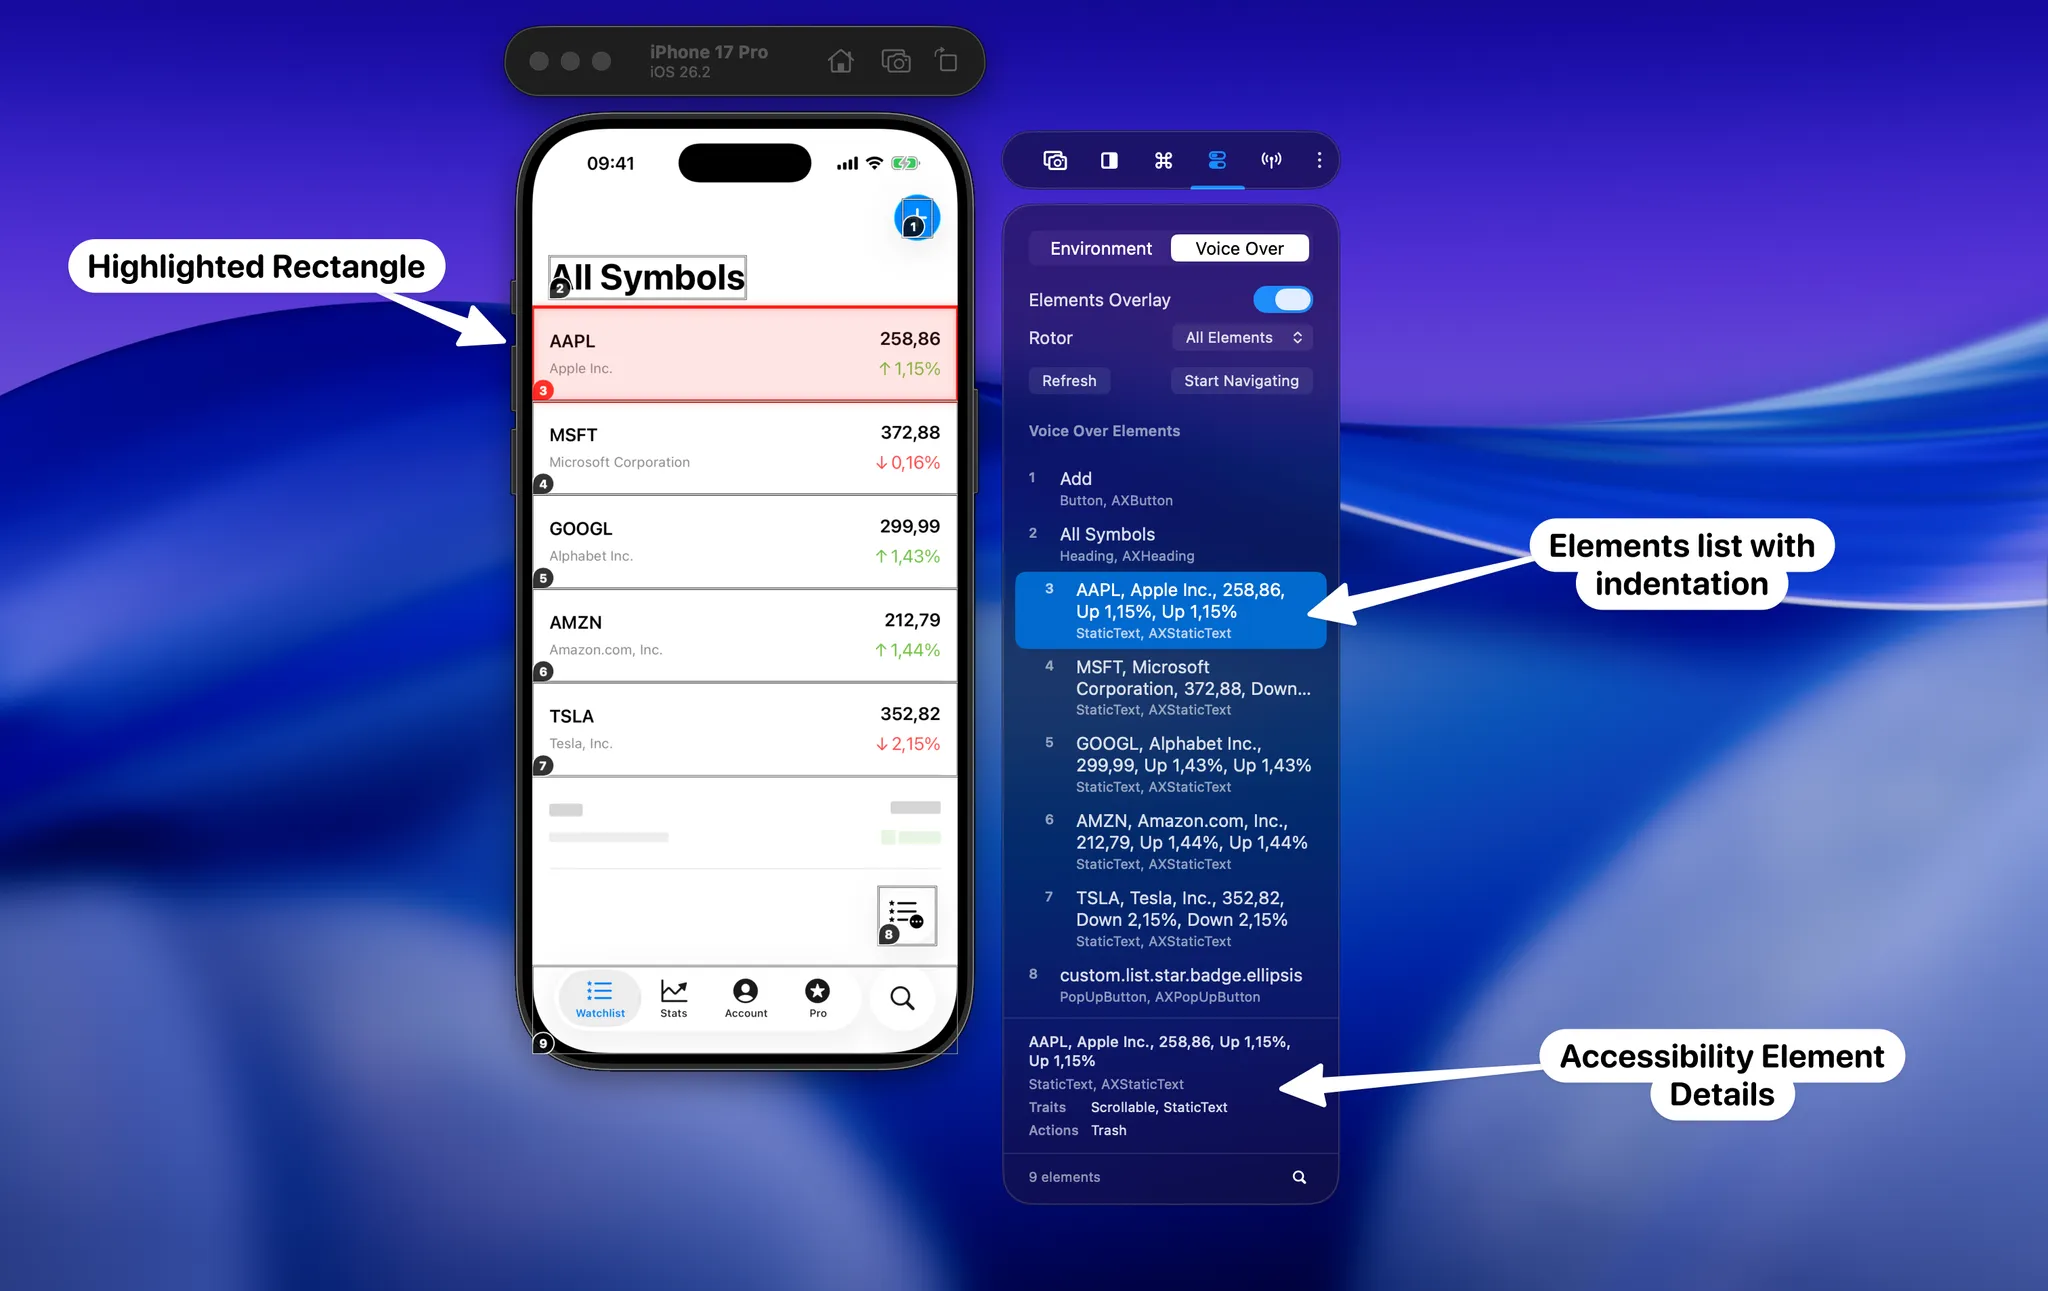
The Elements Overlay shows every accessibility element on top of the Xcode Simulator, in VoiceOver order.
From the side window you turn on Elements Overlay and pick a rotor category from the dropdown — for example All Elements, Headings, or Form Controls. Each element gets a number and a row in the list with its role, so you can immediately see whether a heading lands where you expect it or whether a static text element accidentally became a button. The element count at the bottom is a useful sanity check on its own.
Because the overlay is rendered live, it updates as your app updates. Push a new view, hit Refresh, and the numbering re-runs. There is no device build, no toggling, no triple-click — you stay on the Mac, in your editor.
Navigating elements with the keyboard, like a real VoiceOver swipe
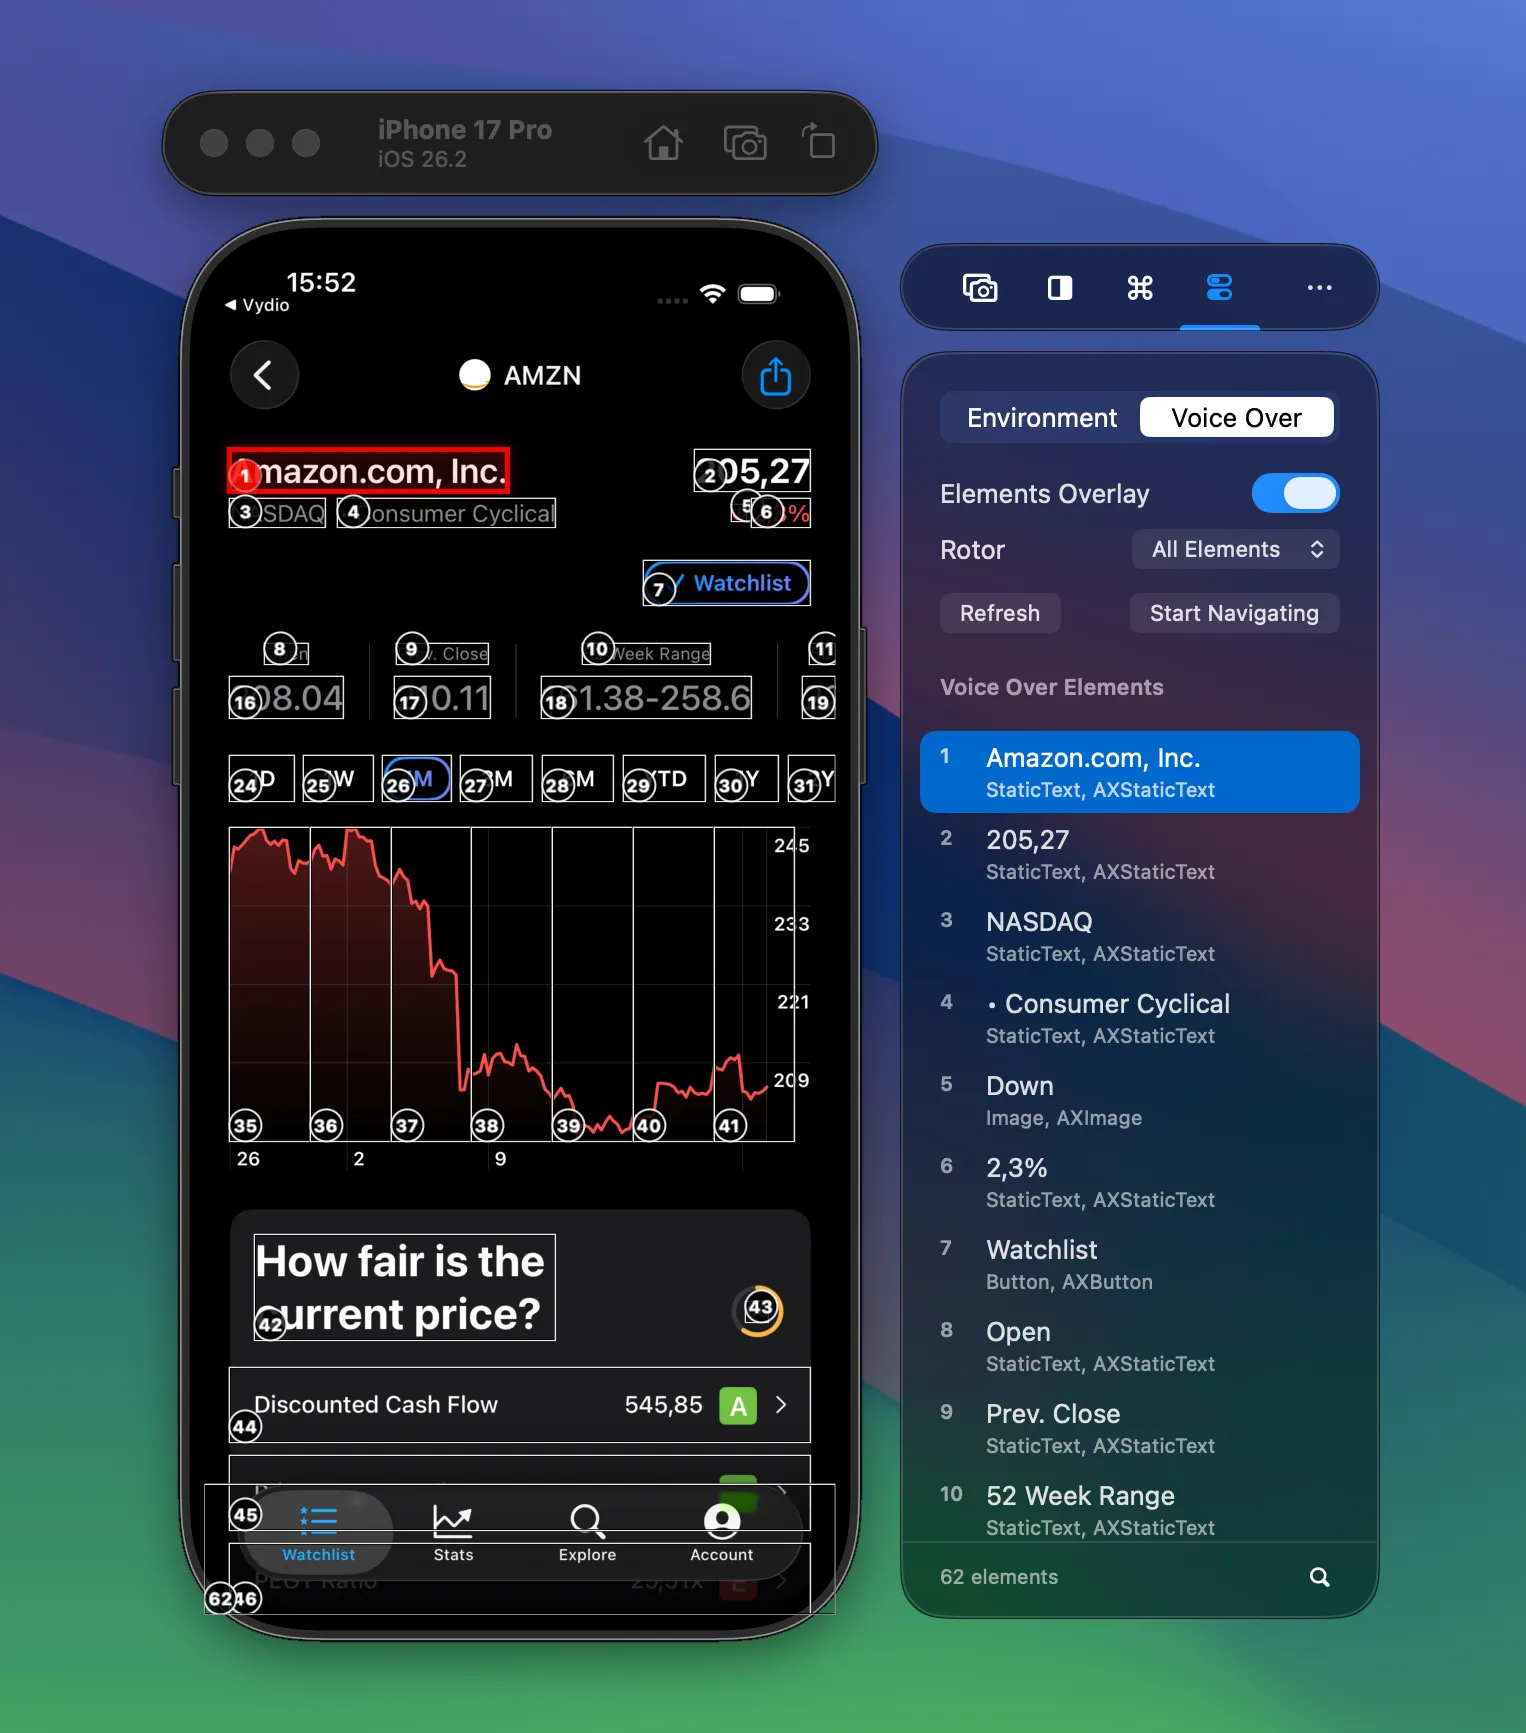
Inspecting elements is useful, but VoiceOver is fundamentally about movement. To replicate that loop on the Simulator, click Start Navigating in the Voice Over panel. The overlay stays on screen and the focus highlight jumps between elements as you press the arrow keys.
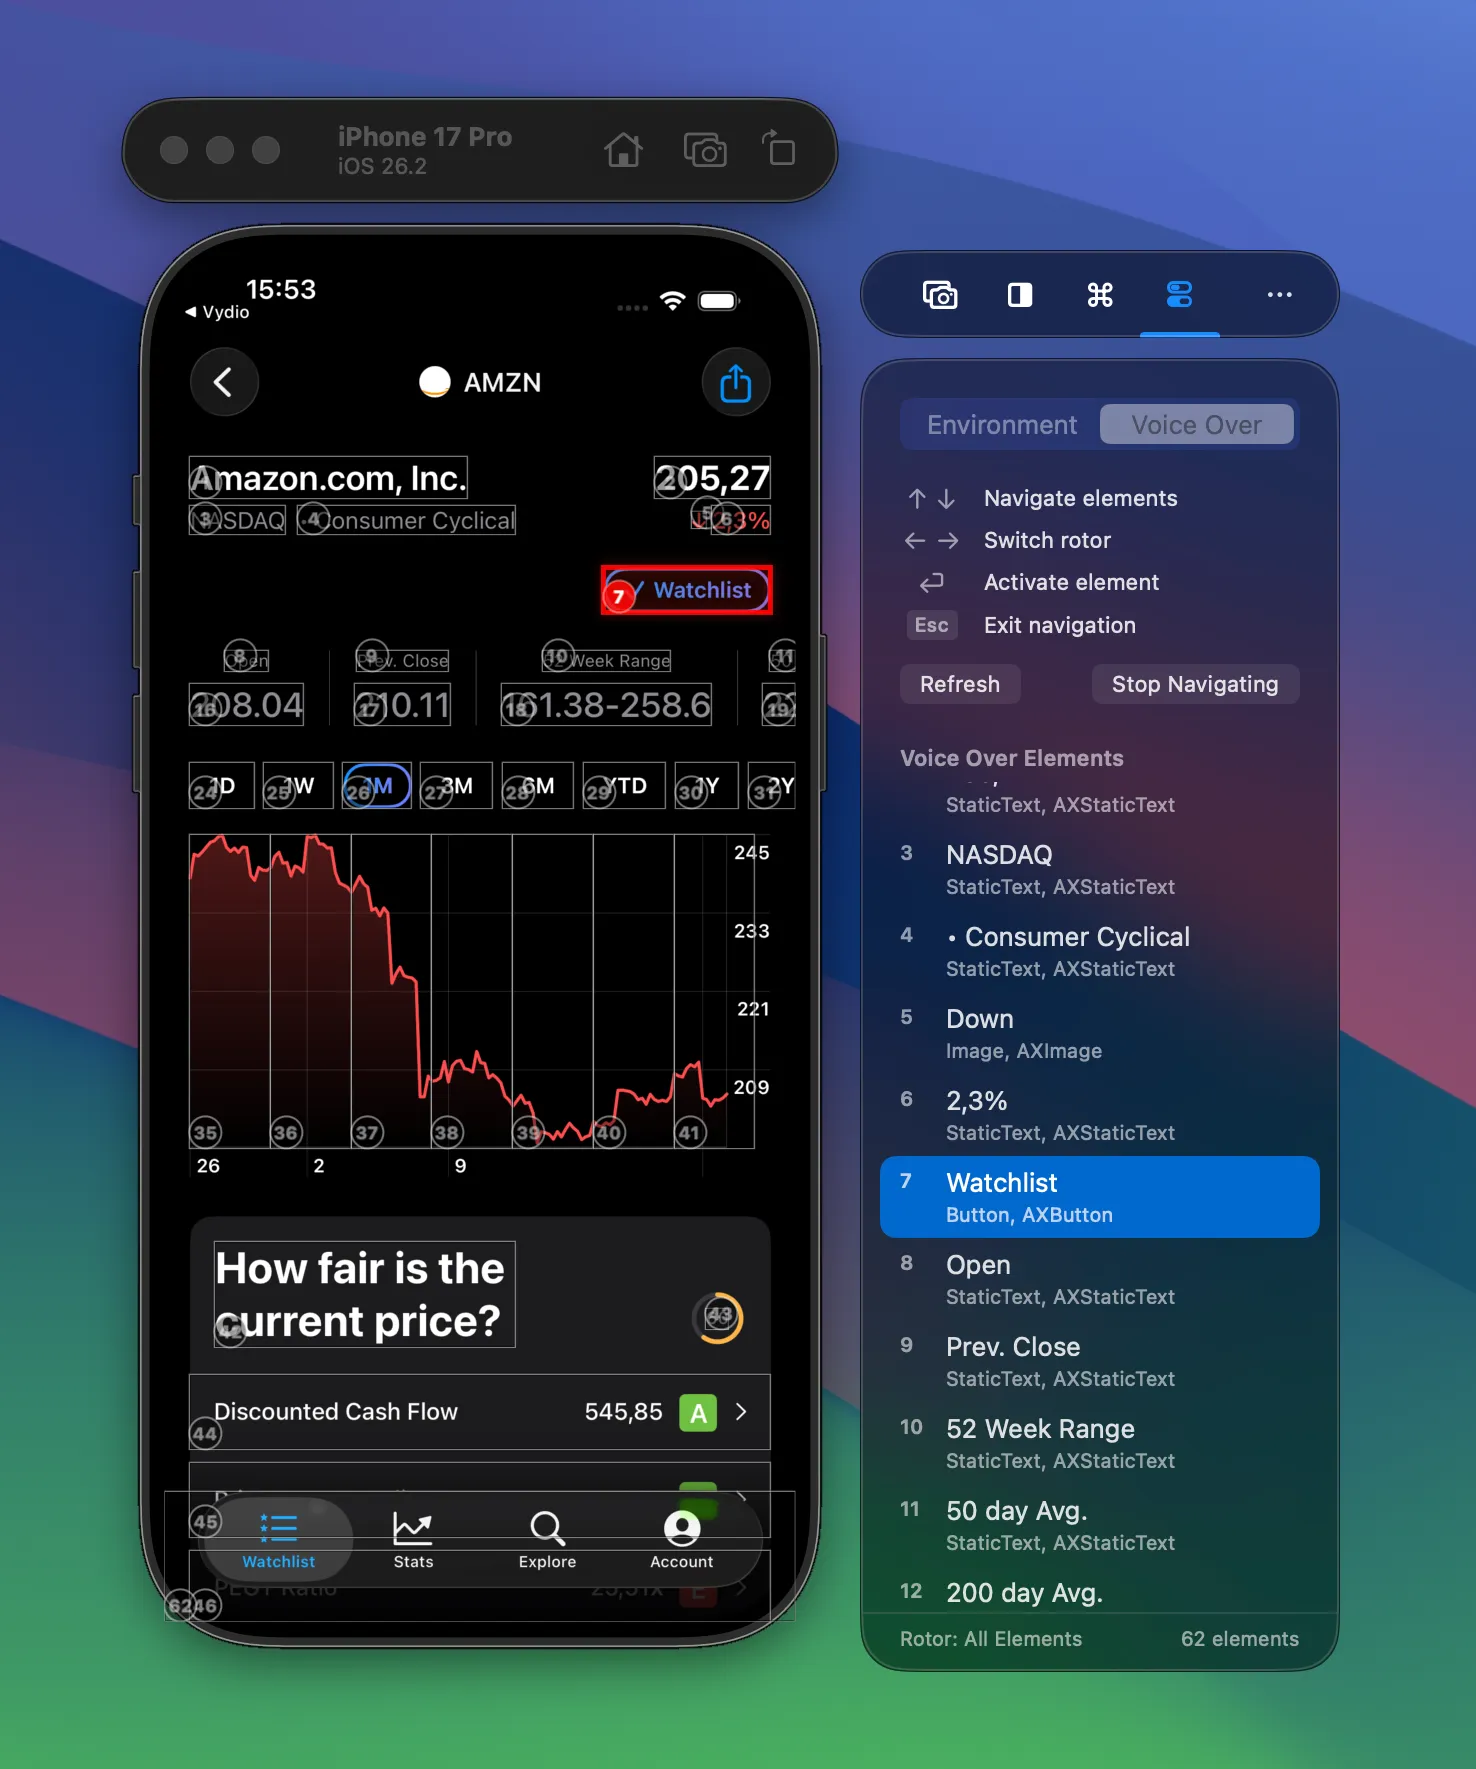
Navigation mode highlights the focused element and lists the keyboard shortcuts for moving through the rotor.
The shortcuts map directly onto VoiceOver gestures:
- ↑ / ↓ — Move to the previous or next element in VoiceOver order, exactly like swiping left or right on device.
- ← / → — Switch rotor category, the way a two-finger rotate would on a real iPhone.
- ⏎ Enter — Activate the focused element, similar to a double-tap; the app navigates and the overlay updates with the new screen.
- Esc — Exit navigation mode and return to the overlay-only view.
This is the part that makes accessibility testing feel like part of the build cycle rather than a separate phase. You step through a screen, spot a missing label or a wrong rotor group, fix it in Xcode, hit Refresh, and verify in seconds. No cable, no headphones, no losing your place.
Combine VoiceOver with the rest of your iOS accessibility checks
VoiceOver is the headline feature, but accessibility on iOS is a stack: Dynamic Type, Bold Text, Increase Contrast, Reduce Motion, Reduce Transparency, and now Tinted Liquid Glass. A screen that reads well in VoiceOver can still fail badly at the largest Dynamic Type size or under Increase Contrast.
From the same side window, RocketSim’s Environment Overrides give you direct toggles for those settings, plus a slider for every Dynamic Type size. So once you finish a VoiceOver pass, you can flip on Bold Text, crank up Dynamic Type, and check the same screen again — without going back into Simulator Settings.
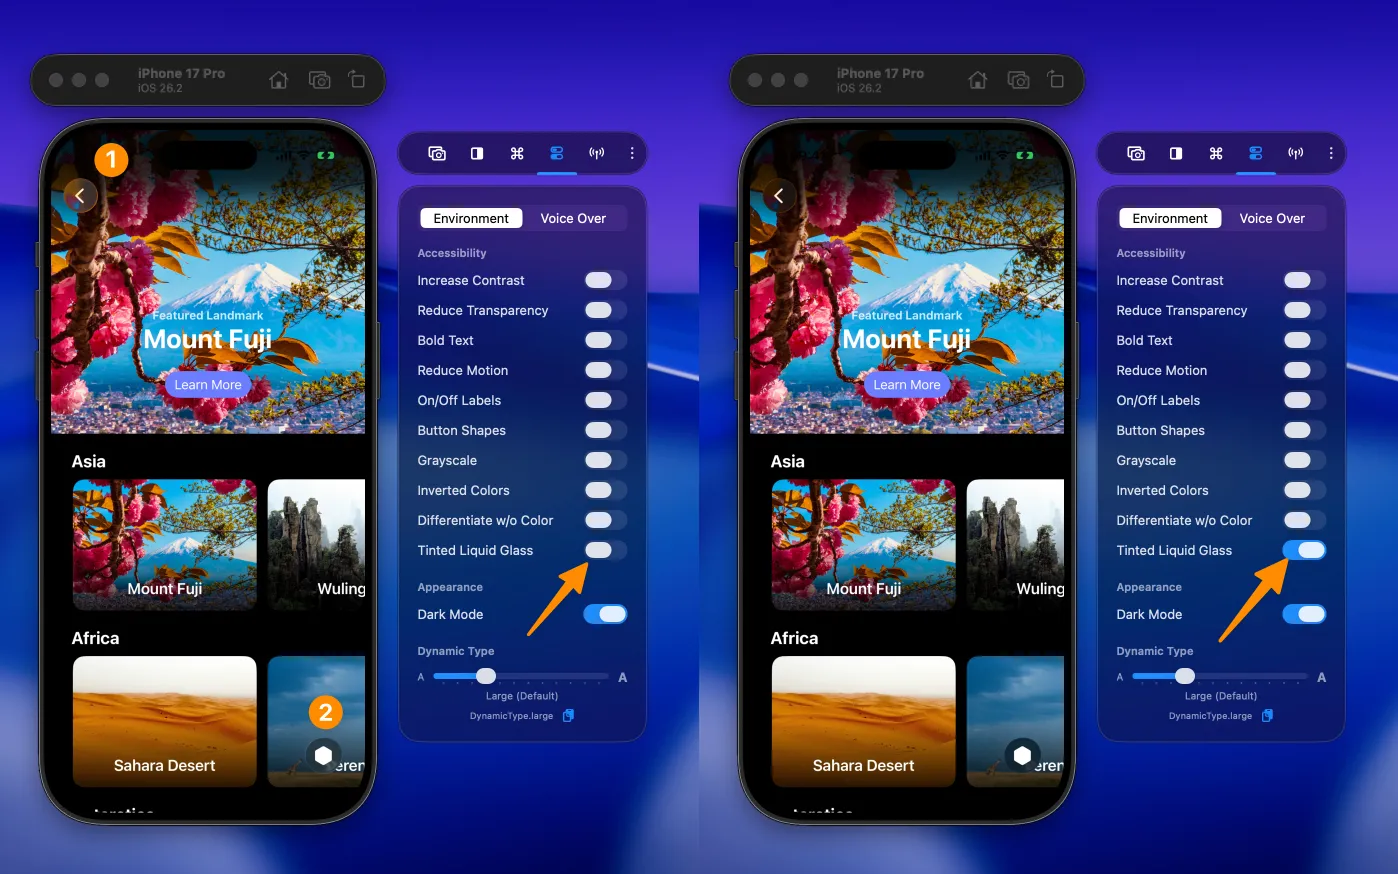
Tinted Liquid Glass is one of several accessibility toggles you can flip from the same panel as VoiceOver Navigator.
If you treat VoiceOver as one stop in a short accessibility checklist — VoiceOver order, headings, Dynamic Type, contrast — you will catch most of the regressions that normally slip through until App Review or a user report. The full set of RocketSim accessibility features is built around exactly this kind of fast iteration loop on the Xcode Simulator.
Conclusion
For a long time, “test VoiceOver on the Xcode Simulator” really meant “give up and use a physical device.” That is no longer true. With a numbered Elements Overlay, a keyboard-driven navigator, and a rotor that matches the device experience, you can verify the reading order and activation flow of an iOS app without leaving the Simulator. A physical device is still the right place for a final pass, but it should not be your default anymore.
If you want to try this on your own app, install RocketSim from the Mac App Store and open the Voice Over tab in the side window. You can also dig into the full VoiceOver Navigator documentation for the keyboard shortcuts and rotor details. Feel free to reach out on X/Twitter or open an issue on GitHub if you run into anything or have feature ideas. Thanks!