AI agents for the iOS Simulator become much more useful once they can see and control the app they are changing. Reading code is powerful, but many iOS bugs only become obvious after navigating the real UI: onboarding steps, login flows, settings screens, purchase states, and accessibility edge cases.
That is where RocketSim comes in. RocketSim gives agents a version-matched CLI and Agent Skill so they can inspect visible elements, tap controls, type text, wait for screen changes, and capture screenshots from the running Simulator. In other words: the agent can close the loop between code changes and app behavior.
Why agents need the Simulator
Most coding agents are great at editing files and running terminal commands. They can read errors, update code, and rerun tests. However, iOS development often has a visual feedback loop that is hard to replace with unit tests alone.
You might change a SwiftUI view and compile successfully, but the button could be hidden below the fold. You might update a navigation path and only discover that the back button no longer appears after moving through three screens. You might fix an accessibility label and still have the wrong reading order.
I do not want an agent to guess whether those changes worked. I want it to open the app, inspect the current screen, interact with it, and report what happened. That is the difference between “the code compiles” and “the feature works in the Simulator.”
How RocketSim helps agents navigate
Agentic Development with RocketSim is built around a simple idea: RocketSim stays connected to the running Simulator and exposes that state to agents through a compact command line interface.
RocketSim lets an AI coding agent inspect and interact with a running iOS Simulator app.
The agent loop looks like this:
- Read the visible UI elements
- Decide which element to interact with
- Tap, type, swipe, or press a hardware button
- Wait for the screen to change
- Read the new state and continue
That might sound basic, but it is the missing piece in many agent workflows. The agent no longer has to rely on screenshots alone or make fragile coordinate guesses. It can use accessibility elements and semantic interactions whenever possible.
Why RocketSim’s CLI performs well
Agent workflows are sensitive to small amounts of friction. Every screen read costs tokens, every oversized response fills context, and every wrong tap can send the agent down a completely different path.
That is why RocketSim’s CLI talks to the running Mac app instead of starting from scratch for every command. RocketSim already knows which Simulator is focused, can keep useful state warm, and can return compact rs/1 output that is designed for agents.
In our internal research, RocketSim’s CLI completed the same agent workflows about 19% faster, avoided wrong taps entirely, and used about 63% fewer estimated tokens than a popular alternative. Looking at the lower-level protocol output, the rs/1 agent format produced 2.7x lower estimated token usage, 9.7x fewer output bytes, and 4x fewer wrong taps overall.
Those numbers matter because they show up directly in your day-to-day agent loop. A smaller screen summary gives the model more room to reason about the task, faster commands reduce waiting, and fewer wrong taps mean fewer recovery steps.
Accessibility elements beat screenshots
Screenshots are useful, but they are expensive context. They require visual interpretation, and they do not always tell an agent which controls are tappable or what a field is called.
Accessibility elements are closer to how a developer thinks about UI. A button has a label. A text field has a value. A tab bar item has a role. When RocketSim returns a compact element summary, the agent can make a more reliable decision with fewer tokens.
This is one of the reasons I like accessibility-driven automation. It rewards you for building accessible apps, and it gives agents a structured way to navigate. If a screen exposes bad accessibility metadata, the agent will struggle in the same area where a VoiceOver user would struggle.
RocketSim can still fall back to screenshots when the accessibility data is not enough. That balance matters. Use structured UI data first, then visual context when needed.
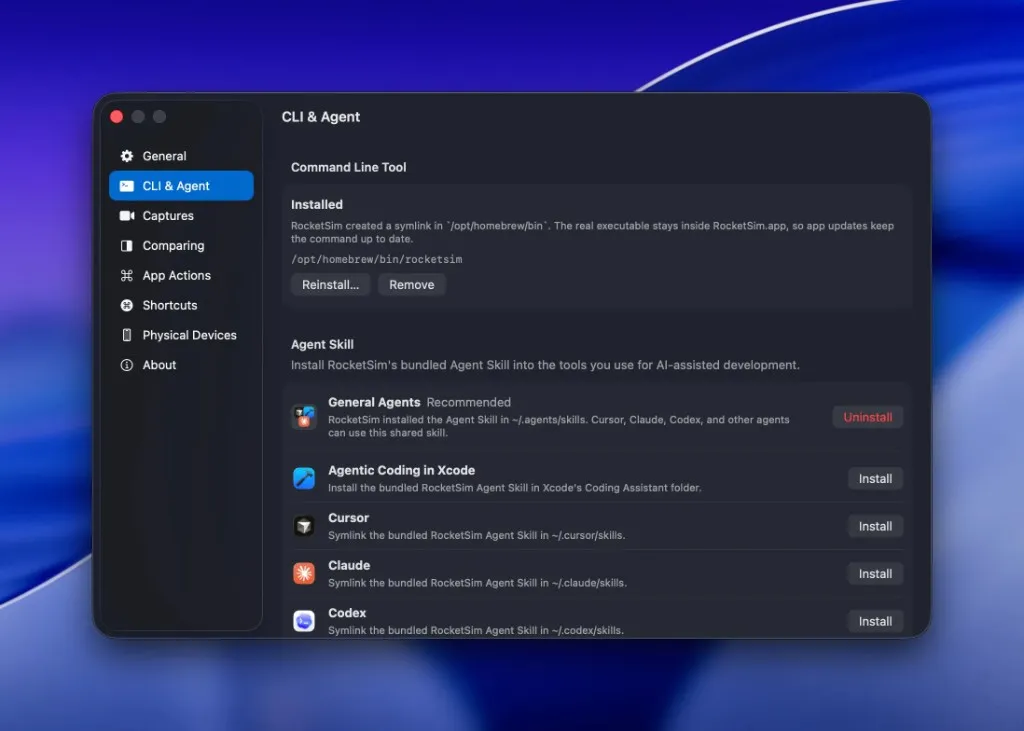
Use the RocketSim Agent Skill
You can call the RocketSim CLI yourself, but agents perform better when they know the right sequence of commands. The RocketSim Agent Skill teaches Cursor, Claude, Codex, Xcode, and other coding tools how to use RocketSim safely.
The skill nudges the agent to:
- Read compact
--agentoutput before interacting - Prefer semantic interactions over coordinate taps
- Wait for screen changes instead of racing ahead
- Use screenshots when accessibility data is sparse
- Run
rocketsim doctorwhen setup looks broken
That last point is underrated. A lot of automation failures are not caused by the app. They are caused by a missing permission, an unfocused Simulator, or a stale tool path. rocketsim doctor gives the agent a first step before it starts guessing.
A practical agent workflow
Imagine you ask an agent to update an onboarding screen. Without Simulator access, it can edit the SwiftUI view and maybe run a build. With RocketSim, you can ask for the full loop:
Use RocketSim to navigate through the onboarding flow in the Simulator.Verify that the new primary CTA appears on the final step and take a screenshot.The agent can inspect the first screen, tap through the flow, wait for transitions, and confirm that the final screen contains the expected CTA. If the accessibility snapshot does not expose enough detail, it can capture a screenshot as proof.
I find this especially useful for changes that are not covered by tests yet. You still need proper tests for critical behavior, but an agent-driven Simulator pass gives you quick confidence before you review the UI yourself.
Where RocketSim fits in your workflow
RocketSim fits after your normal build step. You still use Xcode, xcodebuild, or your existing tooling to build and launch the app, then RocketSim gives the agent a reliable way to inspect and interact with the running Simulator.
That separation keeps the workflow simple. Build tools stay responsible for building, while RocketSim focuses on the running app: visible elements, interactions, screenshots, videos, and recovery paths.
It also means you can add RocketSim to the coding agent workflow you already have instead of replacing it. Let the agent use your build command, then let RocketSim handle the Simulator interaction.
Conclusion
AI agents become much more useful for iOS development when they can navigate the iOS Simulator. RocketSim gives them a practical control layer: compact accessibility summaries, semantic interactions, waits, screenshots, videos, and a version-matched Agent Skill that explains how to use everything together.
If you already use a coding agent for iOS work, install RocketSim from the Mac App Store, then open Settings → CLI & Agent and install the command line tool plus the RocketSim Agent Skill. You can also read Apple’s accessibility overview to understand why structured UI metadata matters for both users and agents. Feel free to reach out on X/Twitter or open an issue on GitHub if you have ideas for better agent workflows. Thanks!